Properly taking care of your inventory will require at some point in time the use of Maintenance reporting. Items will break, get stained, get lost or damaged in some way. It is important to mark these items as away for Maintenance in order to avoid renting out products that are not available. Using the RentalTrax Maintenance reporting tools you can: create maintenance lists, view a products maintenance history (to decide whether to sell the item, keep it, or replace it), view accurate product availability. To view your Maintenance Overview, go to: Products > Maintenance > Maintenance Overview.

|View the How-To Video HERE: Maintenance
1) Maintenance Dashboard Title
2) Search Field – Use this field to search for specific items within your inventory
3) Ongoing Maintenance Column – Any items that are currently scheduled for maintenance will be listed here. You will be able to view what is being done to the items, as well as download reports on that inventory item.
4) Future Maintenance Column - Any items that are scheduled for maintenance at a later date will be listed here. You will be able to view what is being done to the items, as well as download reports on that inventory item.
5) Individual Selection Check Box – Use the check box beside the product to enable the reporting features, such as exporting that products maintenance report to excel. This check box will select one item only.
6) Check All Check Box – By using this check box, you will select all items within that column. This will enable reporting features such as exporting all products maintenance reports to an excel file.
7) Completed Maintenance Column - Any items that have completed maintenance will be listed here. You will be able to view what has been done to the items, as well as download reports on that inventory item.
8) Product Listed and Edit Link – View the product that has been reported for Maintenance and edit what has been done to the product. Click on the blue “edit” link to change the Maintenance for that product.
9) Start Column – View the start date for the products maintenance. In the Completed Column you will be able to see how long ago the product as sent for maintenance in bold letters with the scheduled start date in brackets below.
10) Description Column – View a brief synopsis of why the product as reported for maintenance. This column is limited in characters. To view a more detailed report of what maintenance is/has been done on that item, use the Edit Link.
11) Quantity Column – Here you will see how many products where sent for maintenance.
12) Report Product for Maintenance Button – Use this button to launch the Report Product screen to schedule a new product for maintenance.
Report Product for Maintenance
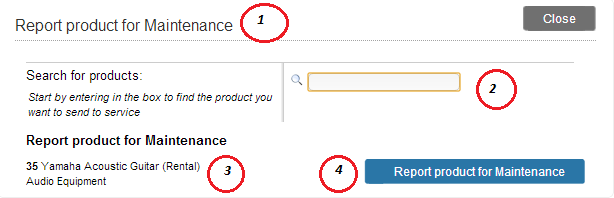
1) Report Product for Maintenance Title
2) Search for Products Field – Use this field to search for the product you wish to send for Maintenance. This is an auto-fill field and will intuitively search for any product containing the sequence of letters you type in. For Example “Yam” will bring up all “Yamaha guitars”.
3) Preview Product – In the bottom left corner of the Report Screen you will see the item listed that you are about to send for maintenance. Ensure that the product is correct here.
4) Report Product for Maintenance Button – Click this button to activate the New Product for Service screen for this product.
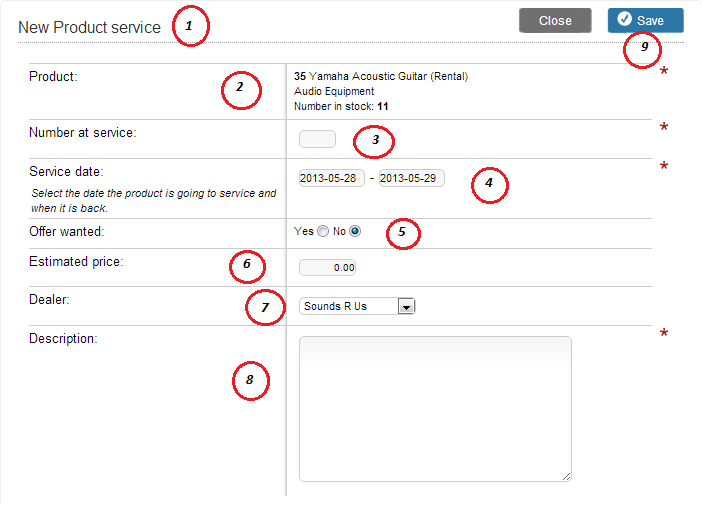
1) New Product Service Title
2) Product Line – The product that is being reported for Maintenance will be listed here.
3) Number at Service – Enter the quantity of items being sent for maintenance. This will affect your inventory levels during this time frame as your stock will be depleted by this amount.
4) Service Date Range – Enter the date you expect the items to be removed from your inventory to the date that you expect the items to be ready for rent. HINT: Do not put the date that the maintenance is scheduled to end unless you can immediately rent the product out again. For example, if the product is sent away for maintenance, you must put the date it returns to your inventory or risk offering products that are not available.
5) Offer Wanted – Toggle between “Yes” and “No” to determine if you would like an offer for this product.
6) Estimated Price – Enter the approximate price for the maintenance required on this item. If you know the specific price, enter it for more accurate record keeping.
7) Dealer – Use the drop down menu to select the appropriate dealer for this product. If you added a deal/supplier to the product upon creation, it will automatically be filled in. If you are getting the maintenance done by an outside source, you can select them from the list.
8) Description – You can enter a detailed or short description of the maintenance being done on these items into the text field. A short description will be used from this field on the Maintenance Overview columns. The entire description will be used when the report is exported from your system.
0 Comments