Activating the Barcode Scanner Module can greatly increase your ability to manage your inventory. The In/Out Dashboard allows you to see the products that are out on a job, and have yet to be checked in and manage the functions through the dashboard. To view your In/Out Dashboard go to Dashboard > In/Out.
NOTE: This Dashboard will not be available unless you have purchased the Barcode Scanner Module. You can do this by using the Upgrade link above your dashboard.
LEARN MORE ABOUT THE BARCODE MODULE BY WATCHING THE VIDEO HERE: BARCODE
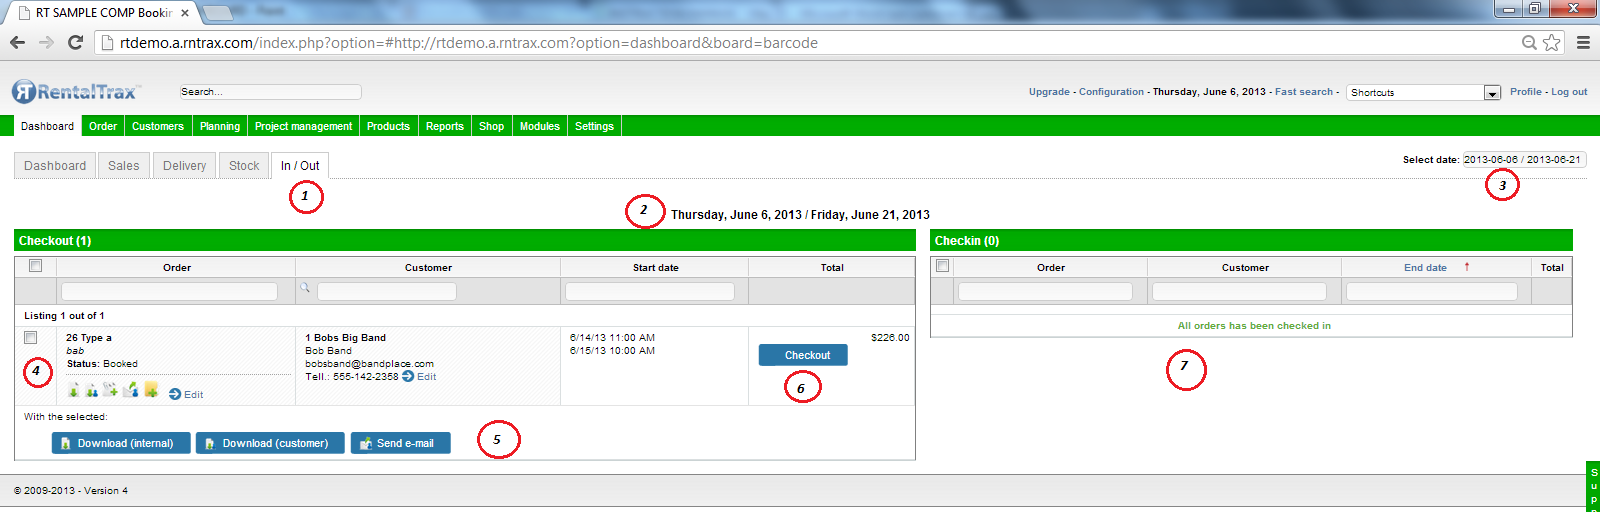
1) In/Out Tab
2) Active Date Selected – The items and activation buttons below will affect inventory for the date shown. You can change the date by using the date range selection field.
3) Date Range Selection Field – By clicking in this field you will activate the calendar function which will allow you to change the date range for check in / check out. Once you have selected the desired date range, the Active Date Selected will change.
4) Check Box – Use the check box to perform download and e-mail functions for the order. You will be able to also use the action icons to perform daily operations on the order as well.
5) Download and email buttons – Use these buttons in coordination with the check box to download paperwork or send communications to your clients.
6) Checkout Button – Click this button to activate the Check Out Process (see below) for the items on the selected order. This will open the pop up screen that allows you to check out specific inventory items or the entire product list for that order.
7) Check In Column – All items that have been checked in on that date will be displayed here. You will have order functions available as well for daily operations on the order.
Check out process
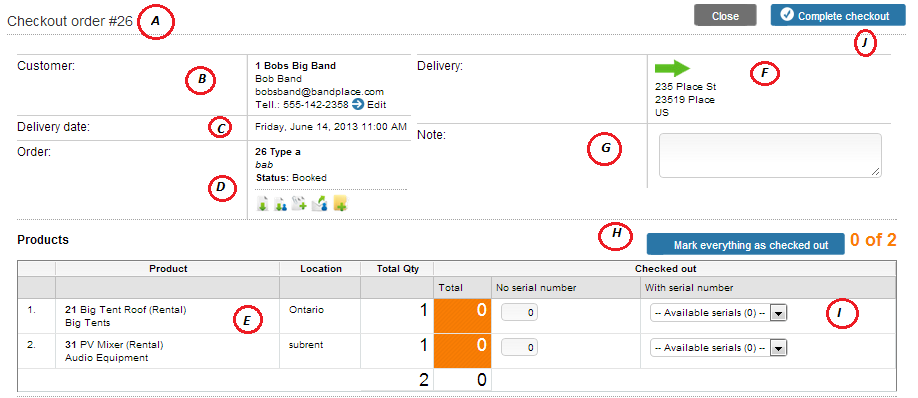
A) Checkout Order Title – The order number will be displayed. You can only check out one order at a time.
B) Customer Information – The customer information will be displayed in this section. You can use the “edit” link to modify the customers information.
C) Delivery Date – The date established for delivery of the order is displayer here. You cannot change this information.
D) Order – Here you will be able to use the action buttons to receive the paperwork for the order. You cannot modify the order once you are checking out the items.
E) Products Section – The items that have been rented will be displayed here allowing you to check out the items. You will be shown the product name, location, quantity and more. In the “Total” column, you will be shown the total number of items that have been checked out.
F) Delivery Location – The location for the delivery of the products will be set here. If the icon shows a green arrow, it is set for delivery to a client. If the arrow is red and facing left, the items are set to be returned to the warehouse.
G) Note Section – Place any internal communications into the text field.
H) Mark Everything Button – Save yourself time and check out all items with the click of a button. If you do not have serial numbers associated with the products, then you will use this button to checkout all items and skip the serial number step.
I) Serial Number Selection Drop Down – Use the drop down menu to select specific serial numbers for the products leaving your inventory. This allows you to manage each individual piece of inventory within your system. If you have not created serial numbers for your products, you can do so by going to Products > List Products > Click on Product > Serial Numbers.
J) Complete Checkout Button – Use this button once the checkout process is complete. Ensure that all the items have been returned to finalize the checkout process. If all items have not been checked out, you will be able to return at a later date to finish the process.
0 Comments