Now that your settings are complete and your inventory is entered, you can place your first order into the system. There are a number of different ways to launch the order sheet. All of the launch directions bring you to the Order Sheet for a New Order Entry. The multiple ways to open the order sheet include:
Read more on the rental and sales order types
* Go to Order > New Order > Select Order Type
* If viewing in Calendar Dashboard, click on: Date the Order Starts (changes calendar to week view) > Click Date the Order Starts Again (changes to day view. This is a double check measure to ensure you are selecting the right date) > Click and drag from time of rental to time of return.
NOTE: If your rental is over multiple days, you can change the end date inside the order screen.
View the How-To Video Here: ORDER ENTRY
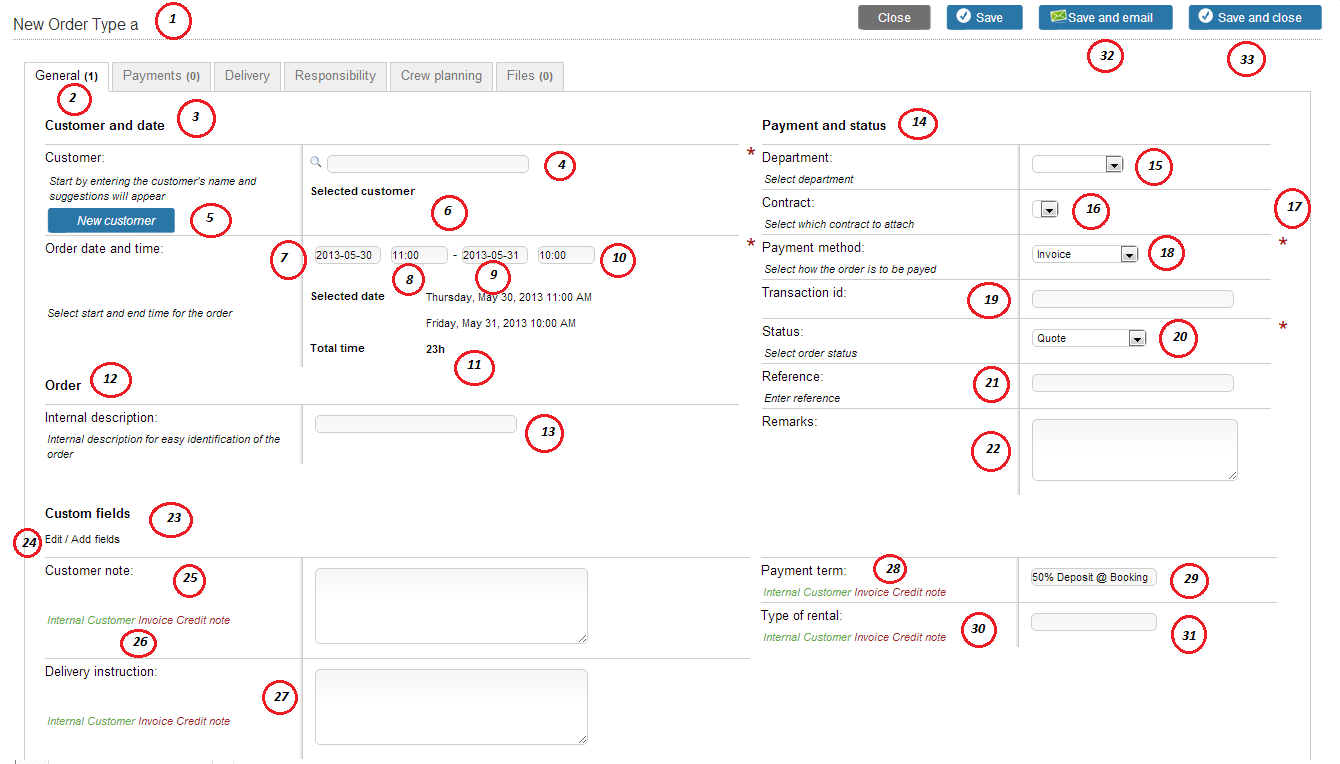
1) New Order Title – Your title will change based on the order type selected.
2) General Tab – The General Tab will be highlighted as you edit this section. The grey tabs including Payments, Delivery, Responsibility, Crew Planning and Files will be explained later in this manual.
3) Customer and Date Section Title
4) Customer Entry Field – Enter the first few letters of the client’s name you wish to place the order for. The system will find any customers with those characters in their name and provide you with a list to choose from.
5) New Customer Button – Clicking this button activates the New Customer Creation Screen. Use this screen to enter vital information about your clients and to keep a database of all of your clients and suppliers.
New Customer Entry
Your customer database can help you with marketing, direct mail pieces, contact information, continued orders, etc. With RentalTrax you can always export your client list to do as you please. In order to have an accurate client database, it is imperative to focus on the filling out the entire customer entry process. To create a New Customer there are 2 ways to enter the client information; go to:
* Click on the “New Customer” button on the Order Sheet
* Go to Customers > New Customer
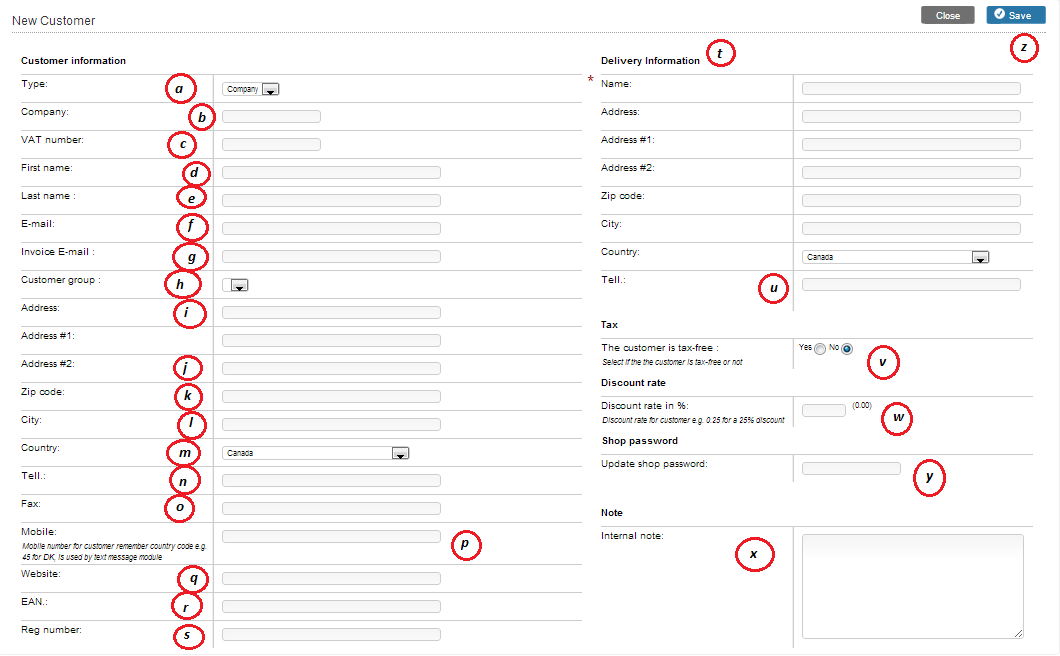
a) Type Drop Down Field – Select the type of customer you are entering into your RentalTrax system. Your options are Company, B2B and Person.
b) Company Text Field Name – Enter the company name for the client you are entering into the system. If you are entering a Person into the system, this field will not be mandatory
c) VAT Number – Enter your tax number into this field so that it can be used on your forms.
d) First Name – Enter the first name for the primary contact that you are entering into your system. This field will be important for dynamic fields within the system.
e) Last Name - Enter the last name for the primary contact that you are entering into your system. This field will be important for dynamic fields within the system.
f) Email Address - Enter the e-mail address for the primary contact that you are entering into your system. This field will be important for dynamic fields within the system. NOTE: You may not duplicate e-mail addresses for contacts within the RentalTrax system.
g) Invoice Email – You may enter the e-mail address relevant to who will be paying the invoice for the order here. This may be different than the client’s primary e-mail address. This e-mail address may be duplicated within the system.
h) Customer Group – You can list your clients under separate customer groups for reporting purposes. This will help you when you are doing any marketing pieces or communications and want to focus on your target markets more specifically. To create customer groups, go to: Customers > Customer Groups
Customer Groups

i) New Customer Group Title
ii) Name Field – Create a unique name for your customer group. This will help you with organizing your contacts in the future. Example customer groups include: Charity, Corporate, Private, etc.
New Customer Entry Continued.
i) Address Field – Enter the mailing address for your client here. This is not where you enter your delivery address for the client as that will be handled later.
j) Address #2 Field – This field is often used to enter the State that your client resides in (U.S.A)
k) Zip Code - Enter the Zip Code for the contact that you are entering into your system. This field will be important for dynamic fields within the system.
l) City - Enter the City for the contact that you are entering into your system. This field will be important for dynamic fields within the system.
m) Country – Use the drop down menu to select the country that your client resides in. This will affect many of the options for your client. This field will be important for dynamic fields within the system.
n) Tell: - Enter the contact telephone number for the primary contact that you are entering into your system. This field will be important for dynamic fields within the system. This field may not be duplicated within the system
- o) Fax - Enter the fax number for the primary contact that you are entering into your system. This field will be important for dynamic fields within the system. This field may not be duplicated within the system
p) Mobile - Enter the Moblie Number (Cell number) for the primary contact that you are entering into your system. This field will be important for dynamic fields within the system. This field will be important if you have activated the SMS Module (explained later in Manual). This field may not be duplicated within the system.
q) Website - Enter the website for the contact that you are entering into your system. This field will be important for dynamic fields within the system. This field may not be duplicated within the system.
r) EAN Number – You can attach a Barcode to your clients for ease of use and faster entry / lookup. If you have generated a barcode for your client you can enter it in this field.
s) Reg Number – Create a unique registration number for your clients. This will help you with tracking your clients actions within your system.
t) Delivery Information Section – Fill out the expected delivery information for this client. This will save you time at the order creation screen. This field can be changed when placing the order by modifying the content under the delivery tab on the order sheet.
u) Delivery Tel: - Enter the telephone number of the contact who will be onsite for the delivery of your products. This number can be different than your primary contacts telephone number and can be duplicated within the system.
v) Tax Free – Toggle between “Yes” and “No” to determine whether the client should be exempt from taxes within your system (i.e. Churches, Native Status, etc.)
w) Discount Rate – If the client you are creating is a preferred client and you wish to provide them with a specific discount rate, you can enter it here. NOTE: The discount rate will only automatically be applied when the client shops using your WebShop. You can manually enter the discount rate using the discount and insurance calculator link on the Order Sheet.
x) Shop Password – When your clients shop online using your WebShop they are given specific log in credentials so that they can review their orders, place new orders under their existing account, etc. If they forget their password, you can create a new password for them to log into their account online. They will be able to modify their password on their own once they are logged in.
y) Internal Note – Enter any internal notices you wish to be shared to your staff regarding this client in the text field provided.
z) Save Button – Save your work often to avoid lost work and wasted time.
Order Sheet General Continued.
6) Selected Customer Display – You will see a display of the customer you have selected in this area on the order sheet.
7) Order Date Start – Enter the date that the order will start on. This will affect the dynamic field {{order_date_start}}.
8) Order Date Start Time – Enter the time that the products will be leaving your inventory for the order. This will affect the dynamic field {{order_date_start_time}}.
9) Order Date End – Enter the date that the order will end on. This will affect the dynamic field {{order_date_end}}.
10) Order Date End Time – Enter the time that the products will be available for hire again. If you simply enter the time the items are returning to your inventory and you have a standard practice of cleaning, inspecting, etc. then you may experience difficulties with your inventory control. If you list your end time as the time that the products become available again, you can hire the products again immediately. This process becomes a standard practice within your company and the timing of the order return is up to your companies policies and procedures.
11) Total Time – The total days and hours your products will be rented for will be displayed
12) Order Section Title
13) Internal Description Field – Enter an internal description for your order here for ease of tracking and identification within your system.
14) Payment and Status Section Title
15) Department Drop Down Menu – Select the department associated with this order. Your departments were previously created as you went through the Settings setup process. If you have not yet setup your departments, please go do so now.
16) Contract Drop Down Menu – Select the contract that you wish to be attached to this order. If you do not wish for any contracts to be attached you may leave the drop down field blank. NOTE: If there are no contract options available and you have already created some standard contract templates, go to Settings > Condition Templates and ensure that each contract has been assigned to an Order Type (or left blank in the order type select field to make available for all order types).
17) Red Star – Fields noted with the Red Star are mandatory fields and must be filled out in order to save the order
18) Payment Method Drop Down – Select the payment method that your client is using to pay for the order from the previously created list in the drop down menu. If you have not yet created the standard method of payment that your client is using, you can go to Settings > Payment methods to create it. NOTE: RentalTrax DOES NOT process payments. The system will list the payment method to make tracking the order simpler for your staff.
19) Transaction id: Enter the transaction ID that you wish to have associated with the order here. This can either be a corresponding ID number to an accounting program that you are using, or to a Merchant Service account that you are using to process payments, etc.
20) Status – Select the status for the order from the drop down menu. The status of the order affects your inventory control, your automail module and your order total within RentalTrax. Here is a description of what each Status means:
- Price Calculation – Used when a client is asking for a quick price reference on your items. Will not affect Inventory or Order Totals
- Awaiting Approval – Used when a client has placed an order and you need managements decision to accept the order. This status is most often used when clients place orders through an Order User or through the WebShop Module. This status will affect Inventory but will NOT affect Order Totals
- Quote – Used when preparing an advanced quote for the client who wished to be provided paperwork for their potential order. This status will affect Inventory but will NOT affect Order Totals.
- Booked – Used when a client has confirmed their order and is going ahead with the rental. This status will affect Inventory and will affect Order Totals.
- Contract Sent – Used when a more formal contract process is created for your client where they wish to determine their booking based on the contract you provide them. This status will affect Inventory and will affect Order Totals.
- Completed – Used when the rental is complete and you are preparing for the final invoice process. Marking the order as Complete will return your items to inventory. This status will affect Inventory and will affect Order Totals.
- Cancelled – Used when you are removing an order from active status. If a client cancels an order you CANNOT revert back to another status. You will be prompted about this final decision. The system will not permanently delete an order from your system. You can only set the status to cancel. This status will affect inventory and Order Totals based on your previous status set.
21) Reference – Enter a specific reference for the order. This can be unique for your own use.
22) Remarks – Enter any remarks regarding the order into the text field. This area will not be shown to the client on any of the paperwork.
23) Custom Fields Section Title
24) Edit / Add Fields Link – Use this link to create new custom fields on your order sheet. You can decide whether to add the field to the customer PDF, Internal PDF, Invoice or Credit Note.
25) Customer Note – Enter any specific notes about your customer into the text field. The fields that are listed in the color green denote whether the information in this text field will appear on that paperwork.
26) Paperwork Selection – If the selection is written in the color green, the information written in this field will appear on that paperwork. If the selection is written in the color red, the information in this field will not appear on that paperwork.
27) Delivery Instruction – Enter any specific delivery notes into the text field. The fields that are listed in the color green denote whether the information in this text field will appear on that paperwork.
28) Payment Term – Enter the payment terms for this order. You can enter this manually if you have not already set the information when you were customizing your layout field.
29) Payment Term Field – To automate the filling of this field, go to Settings > Layouts > Order Layout. Click the edit pencil in the Payment Term field to change the value in this text box.
30) Type of Rental – Use this field to create a specific rental type to help with organizing your orders within your RentalTrax system.
31) Type of Rental Field - To automate the filling of this field, go to Settings > Layouts > Order Layout. Click the edit pencil in the Type of Rental field to change the value in this text box.
0 Comments