Setting up your paperwork is simple with the RentalTrax Order Layout Editor. You can use the pre-existing template and modify it using the simple drag-and-drop interface. Create your own custom fields with the click of a button and place them anywhere you like on the layout. To get to the Order Layout Editor, go to: Settings > Layout > Order Layout.

View the How-To Video Here: Edit Layout
NEW: Want to add images to your order sheets? Watch the How-To Video Here: Layout Images
1) Edit Layout Title
2) Select Order Type Dropdown
Once you have created various Order Types (i.e. Charity, Corporate, Event, Building, etc.) you will be able to specifically customize the paperwork associated with that type. If you are just starting with your RentalTrax system, you will only have “Type a” as your option. That is O.K. Once you have customized this paperwork, you will be able to duplicate your work when creating the new Order Types.
3) Select Layout Type Dropdown
Here you will select which paperwork layout you are editing. Your four options are: Internal – customize the paperwork provided for your internal staff (pick sheets)
Customer – customize the initial order sheet provided to your client (prices, delivery, etc.)
Invoice – customize the final invoice prepared for your client
Credit Note – customize the layout of a credit note that you would supply your client
Each layout that you edit will only be customized for that Order Type. When you create new Order Types, you can duplicate the work that you have created initially to create a uniformed way to present your invoices, credit notes, etc.
4) Layout Tab – When selected you will be editing the entire Layout of your paperwork
5) Fields Not In Use Block
As a preset within the system, there are a number of drag-and-drop options in this column that you can use to customize your layout. Simply drag them into the desired area on the paperwork and update your preview to see the changes.
6) Block’s
In order to provide a guideline as to where you are placing fields within your layout, “Block’s” are created as sections within the paperwork. Each “Block” provides a different section of the paperwork to help keep your fields neat and in appropriate columns.
7) Red Plus Sign
Located within the Block Title is a Red Circle with a “+” in the middle of it. Using this button will allow you to create a new “Field” within that block. When you click on the button, the New Field Edit screen will pop up.
New Field Edit
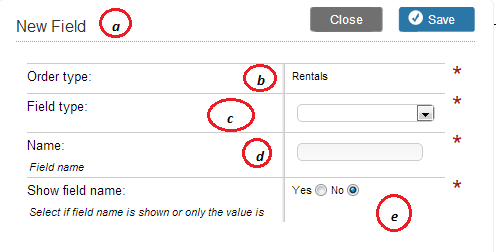
a) New Field Edit Title
b) Order Type – This is preset as you have already chosen to edit this Order Type Layout
c) Field Type – Select from the dropdown the desired Field Type. Your options are:
Text Line – A single line of text added to the Order Layout
Text Field – Used for larger amounts of text. Will allow you to edit the field on the Order Sheet
Permanent Defined Text – Set a specific text line that cannot be edited at a later date
Dynamic Field – Choose from a dropdown list of predesigned Dynamic Fields to add more automated options to your Layout
d) Field Name – Choose a specific name for your new Field
e) Show Field Name – Toggle between “Yes” and “No” to decide whether or not the Field Name is visible on the Layout. If you choose “Yes” the Field Name will be bolded before the text that is displayed.
Once you have selected your Field Type, your New Field Edit display will slightly change
New Field Edit Adaptation
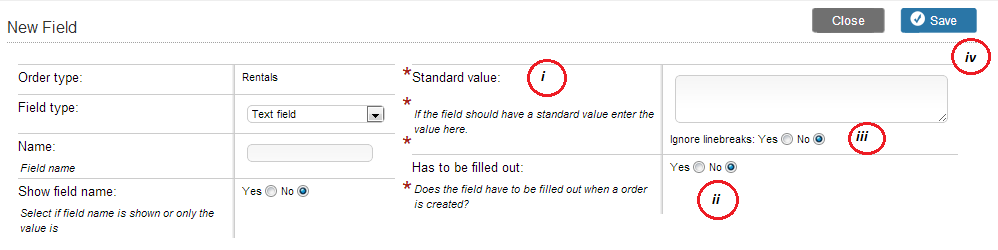
i) Standard Value – If the field should have a standard value, enter it here. This means that if there is a specific text you want displayed, place it in this area. If you are editing a Dynamic Field, select the Dynamic Field from the drop down menu.
ii) Has to be filled out – Toggle between “Yes” and “No” to determine whether the field has to be filled out. If you select “Yes” then the field will be marked with a Red Star and will be necessary to fill out on the order sheet before you can save the Order. Please note that if you have placed any text in the Standard Value text box, the order sheet will mark it as complete.
iii) Ignore Line Breaks – Toggle between “Yes” and “No” to turn line breaks on or off. If the line breaks are “Off” by selecting “Yes”, then your text will run together in one line.
iv) Save Button – When editing anything inside RentalTrax, remember to Save your work.
8) Edit Current Field Icon
Click on the grey/brown pencil to edit that field. Once you click on the icon the edit field popup will be displayed. This popup functions the same way as the New Field Edit screen
9) Delete Field Icon
The Red “X” located on the drag-and-drop field will allow you to permanently delete that field from your layout options
10) Update Preview Button
Use the Update Preview Button often to see the changes you are making to your layout. This can be particularly helpful when customizing spacing between fields on the paperwork.
HINT: If you wish to separate fields from each other for spacing, create a New Field – Permanent Defined Text, and leave it Blank. Then drag-and-drop the new field where you wish the line space to go.
11) Preview Display – View the changes you are making to your layout here.
12) Products Line – Here is where your product lines will show on your order. Use it as a guideline when placing fields above and below your products on the layout
13) Save Layout Button – Make sure that you save your work consistently here. The layout edit process can be long and tedious, so don’t waste time and have to start over from scratch.
0 Comments