Entering your products into the system is simple using the product entry section of the order sheet. You are provided with many options to create the proper invoices and orders for your clients.
View the How-To Video HERE: Product Entry
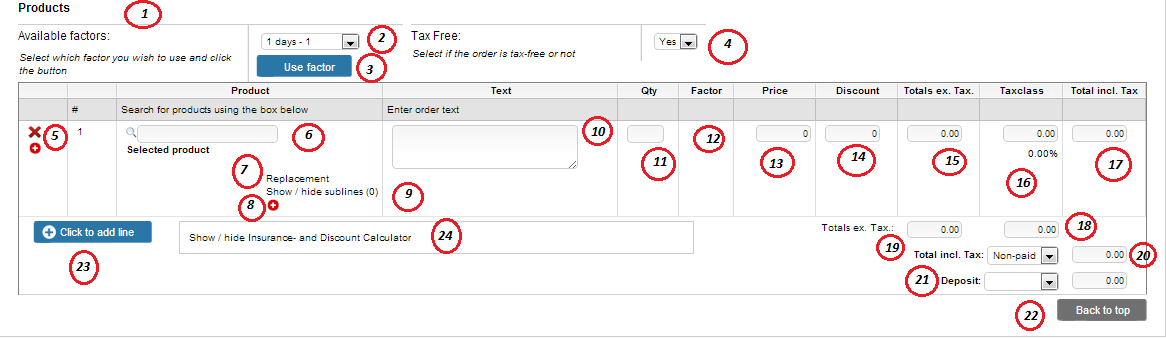
1) Product Section Title
2) Available Factor Drop Down – Select the appropriate factor group to assign to the order from the drop down list. You will only be able to apply factors that have been previously setup in the Factor Master using this drop down list. Select the factor group from the list and then click the “Use Factor” button.
3) Use Factor Button – Applies previously selected factor group to the order
4) Tax Free Drop Down – Toggle between “Yes” and “No” to determine whether you want the entire order to be “tax free”. This option is used when dealing with clients such as Churches, Status Clients, etc. This will make all taxes within the order equal zero.
5) Red X icon – Use the red X to remove a product from the order. This will remove the item and any subline items associated with the product.
6) Product Search Field – Enter in the product that you wish to add to the order. The system uses an intuitive feature and will automatically look up the pieces associated with the letters entered. Using this function, you can look up products by category, name, etc.
7) Replacement Link – Use the replacement link to add the replacement value of the item to the order sheet. The value that will be assigned will be the price you entered into the product replacement value field when creating the product. NOTE: You cannot use the replacement link until you have created the virtual product “Replacement Product”. This virtual product will be placed into the order line with the text you have created stating that the client is being charged for the replacement of the item. ALSO: Using the replacement link will not remove the item from your inventory. The system understands that you will replace that stock; otherwise it would affect all of your orders going forward.
8) Red + icon – Use this icon to create new sublines for this product. This can be useful if you are adding small items such as clamps, tool box, tape, etc. to an order that you do not wish your client to see.
9) Show / Hide Sublines Link – Toggle between showing / hiding the sublines on the order sheet to make it easier for you to use the program.
10) Order Text Field – The field will be auto-populated with the text that you entered when creating the product.
11) Quantity Field – Enter the quantity of the product that you wish to rent in this field. If you have not disabled Stock Control (Settings > Basic Settings) you will be limited to the stock you have on hand. Going over the on-hand stock value will result in an error message and your quantity being reverted to the number you have available. If you have disabled Stock Control, you will be able to book as many items as you wish.
12) Factor Field – Based on the length of the rental, the factor group associated with the timeline will be entered here. You can modify this field.
13) Price Field – The price of the product rental will be entered here. This value is entered when you first created the product and will be multiplied by the factor group. You can not modify this field. To change the price of an item, you can either use the discount calculator or change the price within the factor field.
14) Discount Field – You can use the discount field to provide a discount per piece to the product. This discount will be taken off of the price of the item and then the new price will be multiplied by the factors to create your total for that product. If you wish to provide a percentage discount for the item you can do so by using the discount / insurance calculator.
15) Total Excluding Tax Column – Here you will see the total for the product line before tax. You can not edit this field.
16) Tax Class Field – Here you will see the tax class associated with that product that you set when you created the product initially. You cannot edit this field.
17) Total Incl. Tax – Here you will see the total of that product line that includes all tax and price discounts applied. You cannot edit this field.
18) Taxclass Total Field – This field displays the total of all taxes for the order. You cannot edit this field.
19) Total Excluding Tax Field – Here you will find the total of all products on the order before taxes. You cannot edit this field.
20) Total Including Tax Field – Here you will find the total of all products including taxes and discounts. You cannot edit this field.
21) Deposit Line – Do Not Use this line as it is part of the old RentalTrax system and maintains no function within the system. For deposits and payments, please use the Payments Tab described later in this manual.
22) Back to Top Button – Use this button to return to the top of the order sheet.
23) Click to Add Product Button – Use this button to add product lines to your order sheet. This will give you the ability to add new core products for rent to the order.
24) Show/Hide Discount Insurance Link – Click this link to activate the discount and insurance calculator
Discount and Insurance Calculator
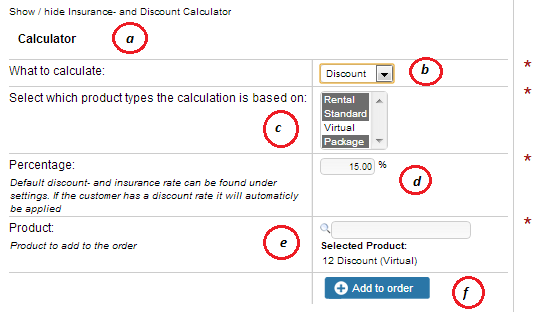
a) Discount and Insurance Calculator – Use the discount and insurance calculator to add insurance, discounts and delivery to your order as a percentage.
b) What to Calculate Drop Down – Choose between Insurance, Delivery and Discount to add those price increase or decreases to your order.
c) Calculation Types – Highlight the desired product type you wish the calculation to effect. If you have highlighted the product type, the percentage will be applied to all products that are that type of product. HINT: Hold the Ctrl button on your keyboard to highlight multiple product types.
d) Percentage – Enter the percentage of the price increase or decrease here.
e) Product – Select the product that you wish to add to the order. If you have set the standard insurance, discount and delivery products in your basic settings (settings > basic settings) then this field will auto-populate. If you haven’t created your virtual products yet, then you can do so now (Products > New Product). You may also choose to insert a different product if you wish the order line to read something different than the standard product you have chosen.
f) Add to order button – Click this button to insert the percentage into the order.
HINT: You cannot use the percentage calculator to affect a single product. The calculator will affect all products under a product type. To apply a specific price based discount, use the discount field on the price line.
0 Comments