Creating your inventory in RentalTrax is flexible and simple with the idea that you can create a detailed inventory system that works within your business. You are provided multiple levels of stock control to help differentiate between products. Each product can fall under four types of Products: Rental, Standard, Virtual and Package. To create new Products, go to: Products > New Products.
Read more about the product types

View the How-To Video Here: PRODUCTS
1) New Product Title
2) Rental Products – A Rental Product is considered any inventory item that is leaving on a set date, and has an expected date of return. Click the check bubble to create a new Rental Product.
Example: Cars, Linens, Lighting, Staging, Furniture, etc.
3) Standard Products (Sale) – A Standard Product is considered any inventory item that is being purchased from your inventory with no expected date of return. Click the check bubble to create a new Standard Product.
Example: Flowers, Candles, Lights, etc.
4) Virtual Product – A Virtual Product is considered any inventory item that is not a physical product. Click the check bubble to create a new Virtual Product.
Example: Fees, Service Charges, Labor, etc.
5) Package Product – A Package Product is considered a grouping of multiple products together so that the client can purchase the finished product, and you can manage the entire inventory. Click the check bubble to create a new Package Product.
Example: Tents, Backdrops, Machinery, Event Lighting, Furniture, etc.
New Product – Rental / Standard Products
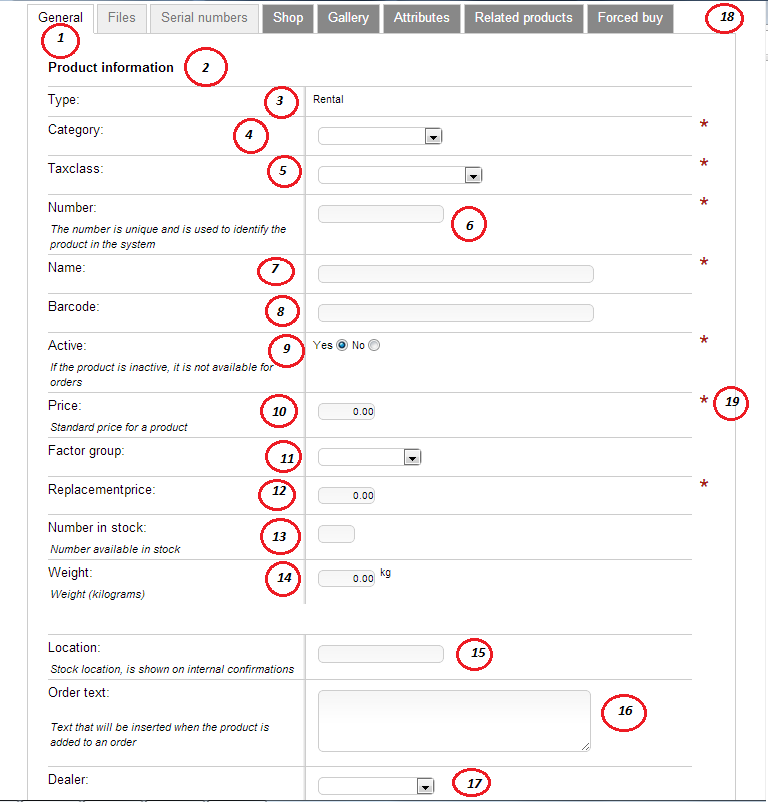
1) General Tab
2) Product Information Title
3) Type – Here you will see that the type for this new Product is “Rental”. NOTE: Once you make a product under a specific type, you cannot change the type of the product at a later date. Ensure that you are creating the correct product type.
4) Category – For reporting purposes and product availability look up, you can assign a product to a specific category using the drop down menu. Categories can be created by going to Products > Categories.
5) Tax Class – Each individual item is associated with a specific tax class that you have created. Using the drop down menu you can attach this tax class to this item. To create new tax classes, go to Products > Tax Classes.
6) Number – The system will assign a unique number for identification purposes within the system. If you wish to create your own unique number you may enter it here. If you create a duplicate number, the system will respond with an error message.
7) Name – Create a unique name for your new product. This field is limited in space due to space constrictions on the paperwork created by the system. This name may or may not be seen by your clients depending on your settings.
8) Barcode – If you are using the barcode module, then a barcode number system will be entered here. The system can automatically generate these codes for you, or you can override the system and enter your own.
9) Active – Toggle between “Yes” and “No” to make a product active within your system. If the product is active, it means that the product is available for rent/sale and you would choose “Yes”. You cannot permanently delete an item once it is in your inventory; you can only mark it “No”.
10) Price – Enter the price of the new product for a standard rental period. Your standard rental period is determined by your business model. You can later apply factor groups to effect the pricing of an item depending on length of the rental.
11) Factor Group – Use the drop down menu to apply a specific factor group to this product. When you decide to apply factors to your order, the product will apply factors based on this decision and the price calculations will be automated for you.
12) Replacement Price – Enter the value of the item if you were to replace it within your inventory. There is an option to charge your client the replacement value (explained on Order Sheet) which is filled in using this value.
13) Number in Stock – Enter the total number of items you have on hand for this product. Do not leave out any items that are gone for maintenance or inactive. You can later create maintenance reports for the items that are not currently available. This will save you a lot of time in the long run.
14) Weight (in kilograms) – For delivery purposes you can enter the weight of the item. When you are planning and scheduling deliveries, you can manage the amount of products entered into a vehicle based on their weight. Note: The only weight measurement available is kilograms.
15) Location – Help your warehouse staff by entering accurate location information. This field will be present on the Pick Sheet that you can download after order creation. Ensure that the location is as detailed as possible to save time when searching for items. HINT: When sub-renting an item from another company, make the location start with “SUBRENT” so that your warehouse staff knows that they are getting that item from another company.
16) Order Text – Enter the text that you want your clients to see when renting/buying this item. The text box is not limited when entering text; however, please note that a large amount of text may affect the layout of your orders.
17) Dealer – Use the drop down menu to tag a dealer/supplier to the new product. This will save you time later when doing things like reporting products for maintenance, pulling product reports by supplier, etc.
18) Other Options Tabs – The tabs along the top of the creation page offer different options for further detailed customization of your products.
19) Red Star – The red star located next to some fields within the screen denote a field that MUST be filled out in order to save the product.
Files Tab
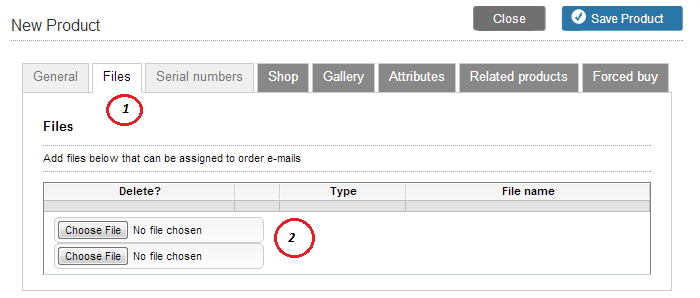
The second tab in the New Product Creation Screen allows you to attach files to your order e-mails. These files are limited to PDF files to ensure that your e-mail account is not listed as SPAM.
1) Files Tab
2) Choose File Action Buttons – Click the choose file button to select the PDF that you wish to attach to this product. Once you have added the file, the Type and File Name columns will be filled in. Example files include: Setup instructions, Images, Directions, etc.
If you wish for these files to be attached to an e-mail you must select “Yes” when asked “attach product files” at the bottom of the e-mail template. NOTE: Sending large files through e-mail is a guaranteed way to get listed as a SPAM e-mail address. Once this happens, there is virtually nothing you can do to reverse the effect and you will have to get a new e-mail address.
Serial Numbers Tab
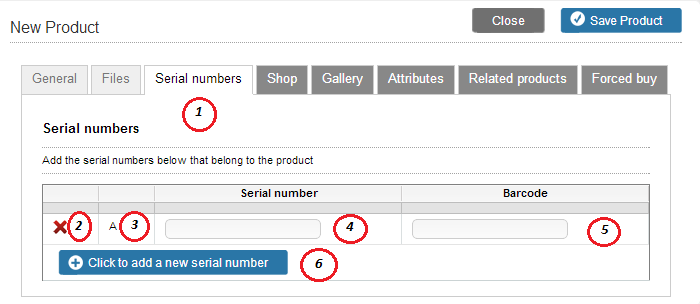
Using the advanced serial numbers feature, you can create even more detailed inventory tracking by attaching individual serial numbers on each item you have in stock. This is controlled through the barcode scanner module for enhanced inventory tracking.
1) Serial Number Tab
2) Red “X” – Use this icon to remove the serial number from that product
3) Product Column – Each item within that stock will be associated a letter for internal tracking purposes.
4) Serial Number Column – Enter the appropriate serial number for each item that is from the product. For example, if you have 20 linens, you would need 20 serial numbers for that product to use this feature correctly.
5) Barcode Column – RentalTrax can automatically generate the barcode for you once you have entered the serial number if you have added the barcode generator module.
6) Click to add a new serial number button – Use this button to add new serial numbers for your inventory. You are limited to the stock amount you added under the general tab.
Note: The Shop, Gallery, Attributes, Related Products and Forced Buy tabs are functions for the WebShop Module ONLY. If you do not have the WebShop Module activated on your system, then you will not see these tabs. Their uses will be explained in the WebShop section of the Manual.
Virtual Product Creation

The Virtual Product creation follows the same process as the Rental/Standard product creation process; however, a few options are removed including: Serial Numbers, Weight and Stock. These items are not necessary when creating a virtual product.
HINT: If you are creating Virtual items such as “Labor”, enter the price as the amount per hour that your will be charging for labor. This will allow you to calculate the price for labor X the hours by using the quantity field.
Package Product Creation
Packages (or bundles) can be a great way to sell your finished product, while managing your inventory at the smallest level. When the client requests to rent a “Tent” for example, they only see the finished product and want a price based on that; however, your warehouse staff will need to know all of the small pieces that go into that tent. This can include: fabrics, poles, flooring, ceilings, duct tape, tools, etc. Create packages from your list of rental, standard and virtual items. To create your packages, go to: Products > New Product > Package

1) New Product Type – This will automatically default to “Package”
2) Price Field – Set the price that you would rent the finished product for. This is not the price for the individual pieces, but for the final result.
3) Products in the package section – Use the following tools to create the items within your package product. You can get as detailed as you see fit.
4) Product Search Field – Enter the first few characters of the products you wish to add to the package and the field will automate your selection. You can choose from the drop down list that is created.
5) Package Product Price Field – This field will be filled in for you when you select your product. This is NOT the price that will be charged for this item when the package is sold, it is merely a guide line for you to use so that you can price the entire package accordingly.
6) Quantity Field – Enter the quantity of the new product that you wish to add to the package. Remember that your inventory will be affected based on these quantities.
7) Click to add a new product button – For multiple products within a package, you must click this button to add more than one product. There are no limits to the number of products that you can add to a package.
HINT: To ensure that your packing lists are fully completed, add ALL of the items needed to complete the job to your package products. This will ensure that when the warehouse loads the trucks for the job, that every single piece needed to complete your promise to your client is present.
0 Comments