VIEW THE HOW TO VIDEO HERE: http://youtu.be/LQYgs_SPfSA
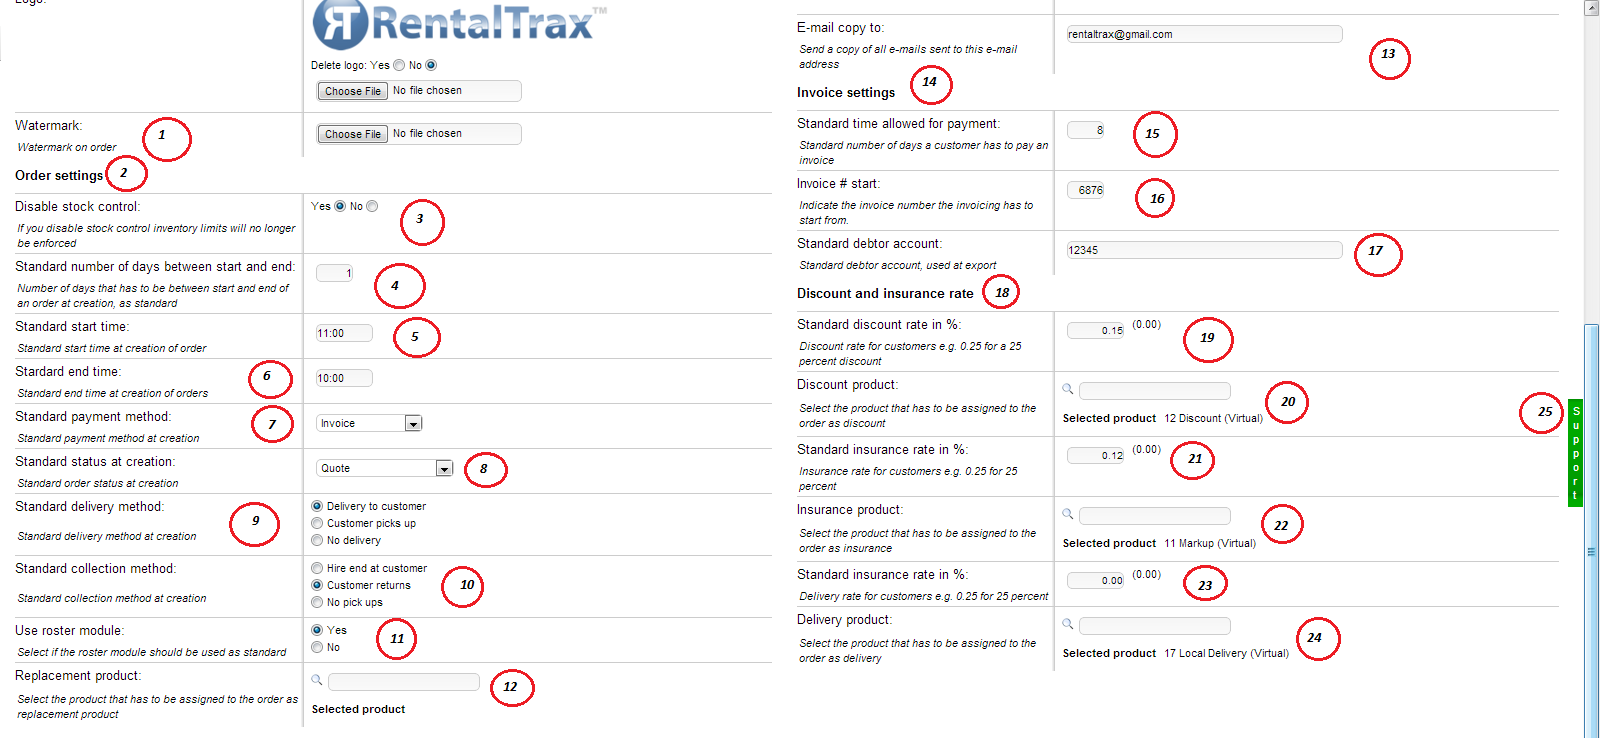
1) Watermark – Upload a graphic to be placed on the back of all of your paperwork behind the text. This image will take up the majority of the page. Please Note that adding graphics as a watermark may distort the text on the page. Choose to upload the file to your watermark using the “Choose File” button.
2) Order Settings Section Title
3) Disable Stock Control
Toggle between “Yes” and “No” to disable or enable Stock Control of your inventory. If you choose “Yes” to disable Stock Control, your system will allow you to overbook items. This can come in handy if you “subrent” or “dry hire” products from other companies; however, you must keep an eye of your inventory levels as you are telling the system to ignore your product levels. If you choose “No” to disable Stock Control, you will be limited to working with the items that you have on hand in your inventory.
4) Standard Number of Days Between Start and End
Enter the standard number of days for your transactions. For instance, a machine or equipment company might rent an item for a minimum of a one week contract (here enter 7 days as standard number of days); however a party hire company may rent items one day at a time (enter 1 as the standard number of days). It completely depends on your business model.
5) Standard Start Time – Set the Open time for your business here.
6) Standard End Time – Set the Close time for your business here.
NOTE: Your start and end time will have an effect on your inventory. If your business rents out an item on a day that is set to return PAST the END TIME for your company, it will not be available the following day in the inventory. The system will automatically assume that you could not have checked the item back into your inventory while your business was closed.
7) Standard Payment Method – Choose the standard Payment Method for your clients upon making an order. This is not permanent and can be changed once in the order creation screen
8) Standard Status at Creation - Choose the standard Order Status for your clients upon making an order. This is not permanent and can be changed once in the order creation screen
9) Standard Delivery Method - Choose the standard Delivery Method for your clients upon making an order. This is not permanent and can be changed once in the order creation screen
10) Standard Collection Method - Choose the standard Collection Method for your clients upon making an order. This is not permanent and can be changed once in the order creation screen
11) Use Roster Module – Toggle between “Yes” and “No” to determine whether or not to use the Roster Module Option within the RentalTrax system. Using the Roster Module (FREE) will allow you to notify, schedule and tag your employees to events and rentals. This can be done in a number of ways and will be explained later in this manual.
12) Replacement Product – Enter the standard item displayed when charging a client for a replacement product. This item must first be created as a Virtual Product in the Product Creation steps later described in this manual. This item should be generic and use wording that denotes that the client is being charged the replacement value for the item that was damaged, lost or stolen.
13) E-mail Copy To – Enter the e-mail address that you wish to have all correspondences and copy’s of communications e-mailed to. This will provide an ongoing receipt for all of your companies communication to be able to pull at a later date. NOTE: RentalTrax does not keep a copy of your communications with your clients and therefore cannot provide this information for you at any time. The best way to maintain these documents is to maintain this e-mail address.
14) Invoice Settings Title
15) Standard Time Allowed for Payment – Enter the standard number of days allowed for payment depending on your business model.
16) Invoice # Start – You may enter the starting number for the invoices you create here. If you have been in business previously and would like your reports to match up, enter the corresponding invoice number to your previous system here. If you are starting up a new business venture and do not wish to show your clients that they are your first customer, you can enter whatever number here that you wish.
17) Standard Debtor Account – Enter the standard debtor account information for your company here.
18) Discount and Insurance Rate Title
19) Standard Discount Rate in % - When you use the Discount/Insurance calculator to place an order, this value will be automatically inserted when the discount option is selected. The percentage must be entered as the decimal version of a percentage. (i.e. 10% = 0.10, 8.5% = 0.085, etc.) This is not permanent and can be changed within the order screen.
20) Discount Product – Select the standard discount product to be applied when adding to an order. The default product entered is “Discount (virtual)” which will place the text associated with this virtual product into the product line of the order. The percentage is based on the amount given using the discount calculator and the standard rate you have previously set.
21) Standard Insurance Rate in % - When you use the Discount/Insurance calculator to place an order, this value will be automatically inserted when the Insurance option is selected. The percentage must be entered as the decimal version of a percentage. (i.e. 10% = 0.10, 8.5% = 0.085, etc.) This is not permanent and can be changed within the order screen.
22) Insurance Product - Select the standard Insurance product to be applied when adding to an order. The default product entered is “Insurance (virtual)” which will place the text associated with this virtual product into the product line of the order. The percentage is based on the amount given using the Insurance calculator and the standard rate you have previously set.
23) Standard Insurance (DELIVERY) Rate in % - This field should read DELIVERY instead of Insurance. When you use the Discount/Insurance calculator to place an order, this value will be automatically inserted when the Delivery option is selected. The percentage must be entered as the decimal version of a percentage. (i.e. 10% = 0.10, 8.5% = 0.085, etc.) This is not permanent and can be changed within the order screen.
24) Delivery Product - Select the standard Delivery product to be applied when adding to an order. The default product entered is “Freight and Postage (virtual)” which will place the text associated with this virtual product into the product line of the order. The percentage is based on the amount given using the Delivery calculator and the standard rate you have previously set.
25) Green Support Button – Using this button will activate the live chat option within your browser. Here you can communicate with a live chat agent, leave a message for tech support, etc.
0 Comments