The Basic Settings of your system forms the core backbone of your entire RentalTrax program. Here you will find the necessary places to access the vital information for your business. A lot of the dynamic fields draw information from here, so it is important that the information you enter into Basic Settings is 100% correct. To access Basic Settings, go to: Settings > Basic Settings.
VIEW THE HOW-TO VIDEO HERE: BASIC SETTINGS
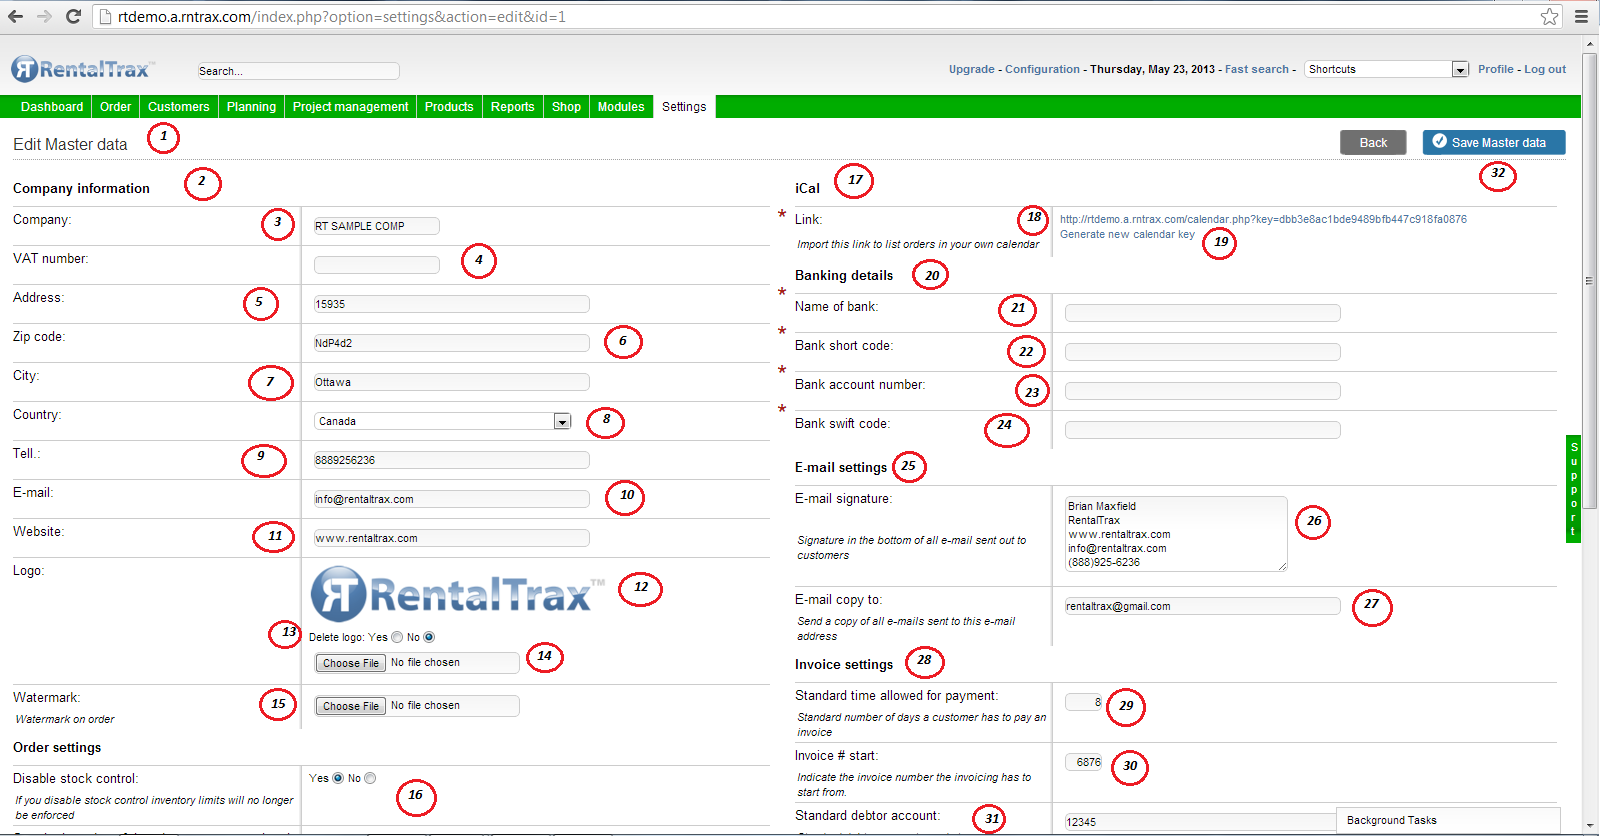
1) Edit Master Data Title
2) Company Information Section Title
3) Company Name Field – Enter the business name as you wish your clients to see it
4) VAT Number Field – Enter your company VAT (Tax) number here
5) Address – Enter your business primary address. This will be used when you choose to have customers return products to you instead of pickup on delivery
6) Zip Code – Enter your company’s zip code here. Depending on your location, this required address may change (i.e. Postal Code)
7) City – Enter your Company’s City here
8) Country – Select your country from the Drop Down Menu. This does not limit you to doing business strictly inside that country.
9) Tell – Enter your company’s primary telephone number here. Users will be able to add more specific direct lines to their profile.
10) E-mail – Enter the primary e-mail address for your company. Any direct reply to mailings sent will be replied to this e-mail address. Ensure that it is an address that is checked often.
11) Website – Enter the company’s website here. This can be helpful when using dynamic fields to place your website on documents.
12) Logo Preview – If you haven’t uploaded a logo yet, this area will be blank. Once you have uploaded a logo, it will appear here for you to view.
13) Delete Logo – Toggle between “Yes” and “No” to decide whether to remove the currently uploaded logo from your system.
14) Choose File – Click on the choose file button to upload a logo from your computer. The preferred format for the image is a JPG format, and has a size restriction to less than 600 kbps. If your image is larger than this size, please seek out ways to reduce the image size. HINT: Your logo will appear on almost all documents that you send to your client. If the logo size is too large, you can run the risk of being labeled as “SPAM” to your clients. Once that happens, there is virtually no way to remove the block from your e-mail account and you will have to create a new account.
15) Watermark – Click on the choose file button to upload a Watermark (image in the background of the entire page). Please make sure that you preview your documents before sending them to a client if you choose to use a watermark as sometimes the image can take away from the layout of the document.
16) Disable Stock Control Option – Toggle between “Yes” and “No” to determine whether to use stock control or not. By disabling stock control, you are giving the system permission to overbook your items. This can be helpful if you are subrenting/dry hiring products in order to meet your clients needs (hint: you can always view how many items you are overbooked using the Stock Dashboard explained at a later point in the manual). If you choose to leave stock control on, you will be limited to renting/selling the items that you have available in your inventory.
17) iCAL Section Title
18) iCAL Link – Use this personal link to subscribe to your Calendar in iCAL, Google Calendar, Outlook Calendar, etc. In order to integrate your RentalTrax system with your Calendar, follow these steps:
Right click on the iCAL link and choose to “Copy Link Address”
Open your calendar program
For Google – click the down arrow beside “Other Calendars”
Choose to “Add by URL”
Paste Link Address into the text field and click OK
Repeat these steps for iCAL and Outlook – NOTE: the wording may be different and involve “subscribing” to your calendar feed.
19) Generate New Calendar Key Link – Use this link to generate a new Calendar key. This would most likely be done when someone leaves the company and you no longer wish them to have access to the Calendar.
20) Banking Details Title – Note that you can remove the option for your clients to see your banking information if you drag and drop the associated fields out of your layout during Order Layout customization.
21) Name of Bank – Enter the name of the bank you wish to have wire transfers sent to here.
22) Bank Short Code – Enter the short code of the bank you wish to have wire transfers sent to here.
23) Bank Account Number - Enter the account number that you wish to have wire transfers sent to here.
24) Bank Swift Code - Enter the swift code of the account you wish to have wire transfers sent to here.
25) E-mail Settings Title
26) E-mail Signature Text Field – Enter the information you wish to display as your e-mail signature at the bottom of all outgoing messages to your client. NOTE: If you wish to include your company logo in your e-mail signature, you can do so by using the dynamic field {{system_logo}} when editing the condition template or e-mail template.
27) E-mail Copy To – Enter the e-mail address that you wish to have all correspondences and copy’s of communications e-mailed to. This will provide an ongoing receipt for all of your companies communication to be able to pull at a later date. NOTE: RentalTrax does not keep a copy of your communications with your clients and therefore cannot provide this information for you at any time. The best way to maintain these documents is to maintain this e-mail address.
28) Invoice Settings Title
29) Standard Time Allowed for Payment – Enter the standard number of days allowed for payment depending on your business model.
30) Invoice # Start – You may enter the starting number for the invoices you create here. If you have been in business previously and would like your reports to match up, enter the corresponding invoice number to your previous system here. If you are starting up a new business venture and do not wish to show your clients that they are your first customer, you can enter whatever number here that you wish.
31) Standard Debtor Account – Enter the standard debtor account information for your company here.
0 Comments