Once you have edited your layout, you can further customize your paperwork by editing the Product Lines. This will allow you to choose the information displayed on your internal and customer paperwork with regards to the products ordered. To get to the Product Display, go to: Settings > Layout > Order Layout > Product Display.
View the How-To Video Here: Product Display Adaption
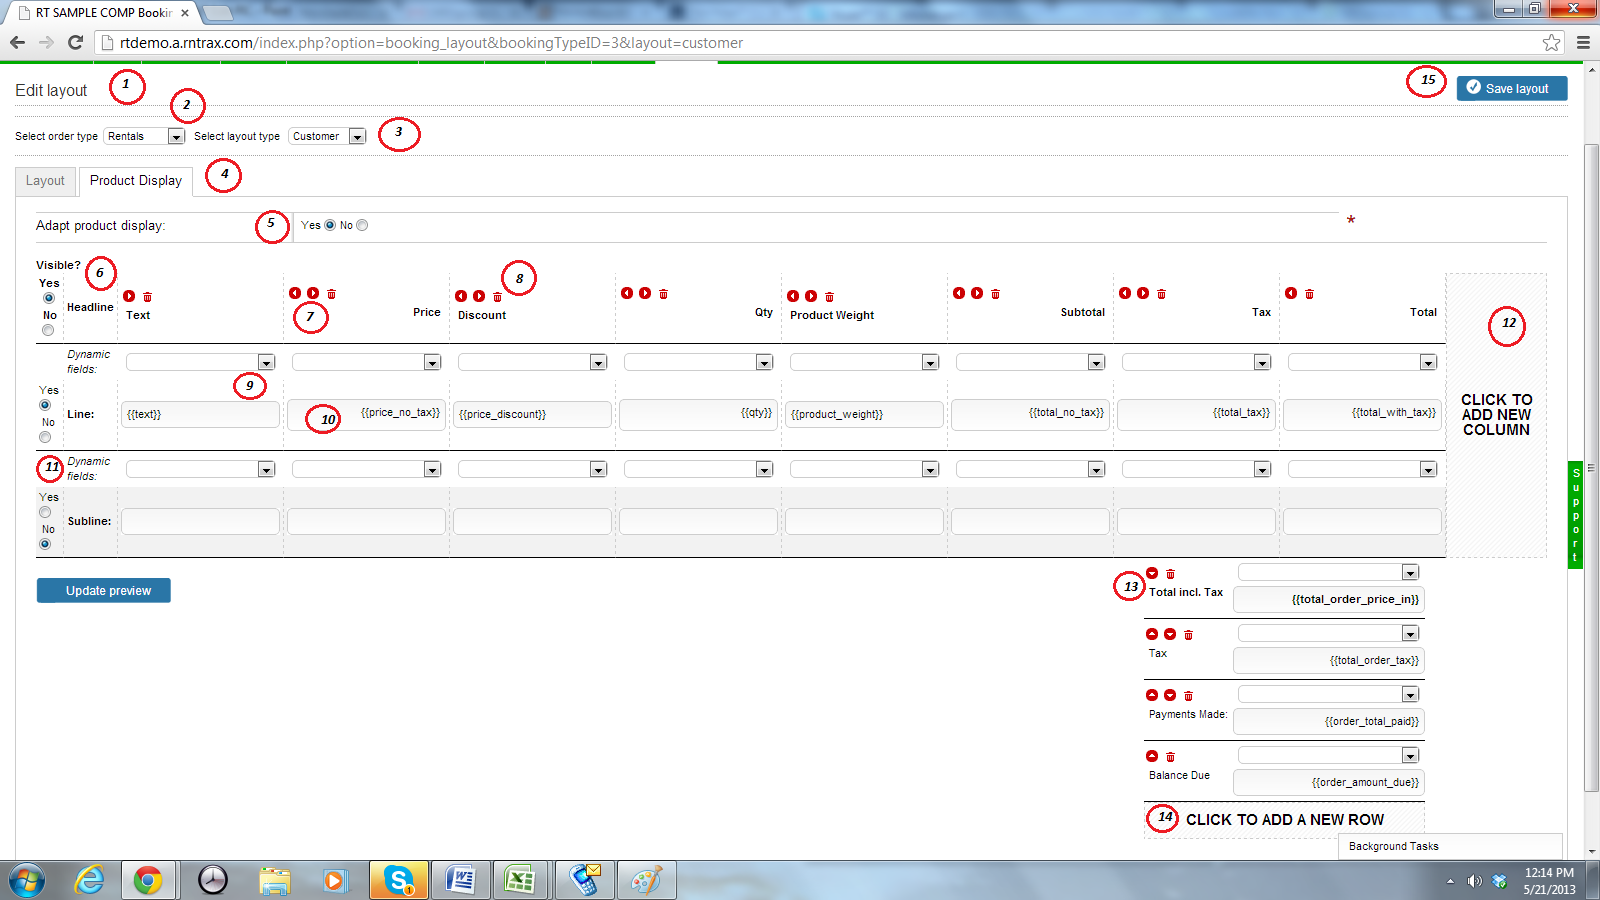
1) Edit Layout Title
2) Select Order Type – Choose from the drop down menu the order type you wish to edit
3) Select Layout Type – Choose from the drop down menu the layout type you wish to edit
4) Product Display Tab – Select this tab to open up the Adapt Product Display Edit page
5) Adapt Product Display Option – Toggle between “Yes” and “No” to edit the Product Lines
6) Visible? – Toggle between “Yes” and “No” to determine whether that line is visible on the paperwork. You can show or hide the Headlines, Products and Sublines
7) Motion Arrows – Move the column left or right using the red motion arrows
8) Trash Can Icon – Permanently delete the column from your layout
9) Dynamic Field Drop Down List – Use dynamic fields to automate the information on the product line
10) Display Text Field – View the dynamic field entered into this line, or enter your own text to display on the product line
11) Subline – Choose what information is displayed on the Subline below the products rented. If you are using Packages as part of your inventory, the subline will display the individual pieces needed to create the package. If you do not wish these items to be displayed, choose “Yes” for the visible option at the beginning of the subline row.
12) Click to Add New Column – Further customize your product line by adding the Columns that you want. Using this feature gives you advanced customization options for your paperwork.
13) Financial Information Column – At the bottom right of your Product Display is the financial totals of your order as a preset within the system. You have the same editing options you did with the Product columns, however the drop down dynamic fields options have changed.
14) Click to Add New Row – Use this feature in the same was as you use the Click to Add New Column button. You can add and customize new Row’s within your system.
15) Save Layout Button – Consistently saving your work will save you time and frustration.
HINT: Setup your Deposit and Balance Due Rows within the RentalTrax System.
Follow these steps:
First:
go to Settings > Layout > Order Layout
Select the Order Type you wish to edit
Select "Customer" from the layout options.
Click the "Adapt Product Display" Tab
Then Choose "Yes" when asked to toggle between "Yes" and "No" to adapt Product Display.
Second:
In the bottom right corner, you have the option to choose to "Add a New Row". Click this option.
Name the new Row "Deposit" or "Payments Made" if you take multiple payments from your clients
Using the Drop Down Menu, then select the dynamic field "order_total_paid"
This will now show on the paperwork the total of all orders paid.
Third:
Click to add a new row
Name the new Row "Outstanding Balance" or "Amount Due"
Using the Drop Down Menu, select the dynamic field "order_amount_due"
This will now take the Total of the order - all payments made, and provide an Outstanding Balance for your clients.
0 Comments